Tuesday, May 17, 2011

New Life for an Old Machete

Some of you are probably wondering: Why bother? After all, machetes are not that expensive—unless, of course, you’re talking about the custom jobs that arguably might not be all that much better than the varieties costing less than twenty bucks at the hardware store. Machetes from south of the Rio Grande on into Central and South America are quite functional and long lasting, and if you happen to purchase one in its country of origin will usually go for less than a ten-dollar bill. So then why go through all the trouble of rejuvenating an old and worn out machete when it’s a lot less trouble just to buy a new one. Well, the answer is…there is no practical answer. And you are right on all counts. Except that I wanted to do it because it’s an enjoyable project and will probably be the last machete I ever bring back to life. The blade has the name Collins & Co. stamped on it with LEGITIMUS imprinted overhead and above that what looks like a crown and a mallet. A collector would know what all that means but I’m no collector—at least not in that sense. When I got my hands on the blade the steel was pitted and had seen the business end of a mill file perhaps a few hundred times. Someone had also removed the original handle. I annealed the steel, heat treated and tempered to about 50 Rc and re-contoured the handle and cut the blade.


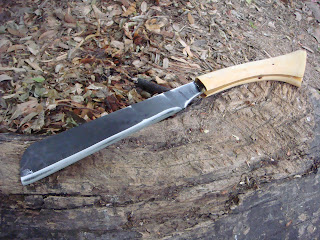
You can see the Collins machete above the Ontario Knife Co. machete I wrote about in the previous post.


The above photo shows you how I planned to cut the handle to create the curved shape ala parang style I enjoy. Notice also that I’ve already made the initial cut at the tip.


This photo shows the finished metal work with the tang reshaped and the blade tip with its final cut.


And here’s the finished machete all ready to go out and take another walk through the woods with me. The handle is chaparro prieto (Acacia rigidula) a common wood in the region. The handle sections are held together via two stout nails I cut and turned into pins, and with an epoxy amalgam of wood dust from a plant called uña de gato, cat claw or Wright’s acacia (Acacia wrightii).


The blade measures eleven inches long. The handle measures 6 ½ inches long. Overall length is 17.5 inches.


Here’s the Collins refurbished machete alongside its cousin the Ontario Knife Co. machete I wrote about in the previous post. Both machetes have sloping handles as seen on your typical Malaysian parang. Of course, the Collins machete is a flyweight compared to the robust parangs of Malaysia. Paul from www.junglecraft.com.my tells me that his parangs are in the 4-5 millimeter range in thickness. That’s one heck of a blade. The Collins blade is only about 1.75 mm thick. Still, on those days when the sun seems to rest just above tree level (brushland trees aren’t very tall) and the wind stirs up a fair amount of dust and not even the flies are out it’s nice to tote an ultra-light machete. The handle on this one feels like the grip on a custom made classic stocked rifle. And once you grip a machete with a handle like the one on this blade you’ll never go back to carrying the run-of-the-mill handles found on the store breeds. This machete probably saw hard use in former times. But now I’ll just sling it over my shoulder in a reinforced canvas sheath and we’ll roam the backlands keeping quiet and checking sign. Maybe we’ll whack a nopal pad out of the way or trim some thorns from an ornery shrub. We’ve got thorns on just about everything around here.  

Sunday, May 15, 2011

Convert a Machete into a Parang

In the preceding article “Brushland Machetes” I posted the following photo of an Ontario Knife Company small machete I’ve owned for nearly twenty-five years. Over the decades this small machete has seen hard use but not in the traditional sense of whacking trails through the woods or fashioning implements at faraway camps. Instead, I’d relegated the blade to a tackle box where it saw action cutting off stingray tails and barbs and other related saltwater fishing chores. That environment is hard on carbon steel so when I finally took it out of service it needed reconditioning for use in the wilds.


Even after re-contouring the blade tip and cutting off a nasty finger-guard that compresses the little finger during chopping thus creating a good deal of pain, I still was not enamored with the tool. The plastic grip was too large. Large grips can be dangerous in machetes because they do not allow the hand to properly grip the handle. This is amplified with plastic grips that become slippery when doused with sweat. In addition the handle jutted out straight backwards from the blade and that strained the wrist when whacking brush. Straight grips become more of a problem with shorter blades than with longer blades because of the smaller arc associated with working a short blade when compared to a long blade. In other words, the longer the blade (within reason) the greater the arc at the tip than near the handle which increases momentum and therefore reduces the amount of energy needed to successfully slice through objects like brush or bamboo.

The Malaysian parang and its cousins in southeast Asia tend to be shorter in length than the machetes used from the Rio Grande south to the Amazon. In order to compensate for the shorter blade length most parangs have an angled (usually downward) handle that adjusts for the shorter arc created in chopping. Some people argue that the parang is not a machete but this is perhaps a debate based more in semantics than logic. Whether they’re called machetes, parangs, goloks, pangas or other names, these blades fulfill an identical task of chopping through light brush whether herbaceous shrubs, bamboo or hardwood saplings.

Anyway, I removed the bulky plastic grip and reshaped the tang as shown below. You’ll notice that the altered tang now has a modest down-sweep.


With the reshaping accomplished I then took a curving section from a chaparro prieto branch (Acacia rigidula) and split it into two parts. I sanded the inner splits smooth then calculated how I wanted the tang to fit into the handle. I took note of the natural slope of the wood and augmented that by placing the tang slightly upward from the slope so that the finished handle would have a distinctive downward curve.

In years past I’ve played around with a couple of parangs “liberated” from distant battle fields in two different wars by a couple of fellows I knew. I liked the ergonomic simplicity of the design and always wanted to duplicate that in a machete. The Ontario Knife Company “military” machete is built for heavy duty and the blade is a bit thicker—measuring 3.0 millimeters with my ruler—than most conventional machetes. Even so, the typical parang is a bit thicker going from 3.0 to 5.0 millimeters or even slightly more. I’m in the process of completing a couple of parangs that will measure nearly one-quarter inch blade thickness but I’m worried they may be a bit too heavy for everyday use. I’ll also finish a handle on a rejuvenated old, thin-bladed machete that will incorporate the ergonomics of a parang.


Here’s the finished Ontario Knife Co. small machete now turned parang. Note the brass pins I used to secure the two halves together. Most conventional parangs use a flimsy stick tang that is inserted into a hole drilled into a piece of wood. Sometimes the stick tang is pinned but often it is simply held in place by tension or glue. In one of the parangs I handled the blade had worked loose  and could simply be slipped out without much effort. The parang was kept on a shelf in the living room as perhaps a remembrance of hardships and lost friends and so the fact that the handle was loose didn’t make much difference.


The above photo gives you a good look at the sloping handle. The difference in “feel” between the new wooden handle and the old plastic handle is significant. The new handle makes me want to carry this blade instead of sticking it in a tackle box.


The chaparro prieto wood handle is mostly white-wood with a rod of reddish heartwood streaming down the center. You can see the heartwood in this photo. This acacia species is very dense with a specific gravity measuring in the low 0.80 range and must be thoroughly dried before using it. This wood was not completely dried and I had a hard time stabilizing it. I’m keeping an eye on it.


I used an epoxy amalgam with guayacan wood (Guaiacum angustifolium) dust mixed into the epoxy. This creates an extremely hard and strong bonding.  This week I plan to finish the old-machete rejuvenation and I’ll post photos of that project when completed.

Parang Dimensions:

Overall length: 16 5/8 inches

Blade length: 10 inches

Handle length: 6 5/8 inches          

Saturday, May 7, 2011

The Brushland Machete

For those of us who live in the rural areas or ranches of the American Southwest or on into Mexico and Central America and amidst the jungles and savannahs of South America the one cutting tool considered the mainstay by which woodcraft or bushcraft plays out is the machete. Whether commercially manufactured or the product of a lone blacksmith’s forge the machete in all its variations and styles is the tool you simply cannot do without. With a machete you can survive assuming you have amassed the skills to acquire food, make a shelter and deliver first aid should the need arise. A pocket knife is nice and a typical bushcraft knife is even better. But neither the folder nor the small fixed blade can do what the machete will accomplish. In all my years of living close to nature whether on ranches or in isolated cabins and throughout a myriad of adventures and explorations I’ve accepted the dictum—as if literally stamped onto tempered steel—to always carry a machete. Walk into a remote village or stumble upon an encampment of native hunters or trappers and you’ll immediately notice that most of the men and boys are carrying machetes. The  average blade length hovers around 24 inches but I’ve seen blades that looked more like European swords while others were no more than about 12 inches long.

The machete is the common man’s multi-tool.  Clearing brush is but the simplest and most menial of the machete’s tasks oftentimes relegated to the lesser skilled amongst the group. Where the machete comes of age is in the hands of the accomplished woodsman who builds his bows, arrows, traps, shelter, furniture, and even creates artwork with nothing more than the long blade and perhaps a piece of bone or the odd canine tooth rummaged from a former kill. Years ago I watched a man fashion a pig trap with a worn down machete he sharpened on a rock and protected with animal fat to keep the blade from rusting in the humid climate. Before I left I gave him a new machete (I had an extra one in my boat) and in return he gave me an intricately carved walking stick. With his machete he’d cut the sapling, shaved off the bark and scraped the wood nearly mirror smooth. Then using the blade’s tip and a broken piece of glass he’d carved out a handle section that reminded me of fine checkering on a French walnut gunstock.

I have no recollection of when I first started using a machete but surely I was in grade school at the time. In the decades since I’ve probably gone through several hundred machetes and like most men who grew up with “un machete” I’ve acquired my preferences. First, I’m not enamored with ultra-long blades. They’re cumbersome for me to carry and use. My ideal blade length is about 18 inches though lately I carry shorter blades primarily for convenience. While I enjoy the lightweight blades produced by Imacasa, Hansa, Tramontina and a few others I realize the more robust or thicker blades as seen, for example, on machetes from Ontario Knife Company are more universal in all applications. But it really comes down to ones intended uses. Unless purposely making a trail (una brecha) through brush most people from the southlands use their machetes sparingly. Hunters, trappers, explorers and woods roamers aren’t keen about making a lot of noise. So they negotiate the path in an independent sort of way weaving left or right or headlong through the monte only using their machetes to slice off an aberrant sapling, cactus or vine. The object is to conserve energy and uphold the silence. The adage says, “Destroy little and preserve a lot.”


Here are some much used Ontario Knife Company machetes I’ve altered to fit my needs. The top two are known as their “military” design and blade lengths were formally 18 inches long. A few years ago I re-contoured the blade tips for reasons both aesthetic and practical. The tips as derived from the factory can catch things like wandering souls who aren’t watching where they’re walking or what the other guy is doing. Besides, I like the way they look now. The blades now measure 15 inches for the rounded tip and 15 ¼ inches for the angled tip.


This is a close up of the smaller machete from Ontario Knife Company, one of two I’ve owned since the late 1980s. Both small machetes had hand guards that I removed because those god-awful things crunched my little finger to the point of being painful. I re-contoured the blade tips to 9 5/8 inches long. Ontario Knife Co. machetes are made of 1095 steel tempered into the lower 50s Rc in order to thwart chipping when whacking stubborn wood. These, my friends, are exceptional machetes but they aren’t cheap especially when compared to some of the Latin American varieties. Because they also weigh more they can wear down the user during prolonged chopping. That’s something to keep in mind when considering your machete and its intended use.


Here are a couple of re-contoured Tramontina machetes. The one pictured on top is probably my most carried machete though lately I’ve used the lower machete on my woods roaming forays. Both machetes received my altered tip treatment and work fine for my needs: slicing away the occasional prickly pear pad or removing thorns from twigs or saplings for making impromptu bows and arrows or building camp chairs, cot frame and pot holding devices. I used the top machete to build four entire bows from rough cutting and shaping to scraping the bellies smooth into final tiller. I’ve done the same thing with a small axe so I’m not trying to imply that the machete is in any way superior to an axe. The blade length on the top machete is 10 3/16 inches and the lower machete is 9 ¼ inches.


Tramontina machetes are inexpensive and we buy them by the case. I took these two out to photograph. Both are 17 inches long with 12 inch blades. Every ranch pickup carries at least one machete; every vaquero slings a machete along with his lasso; and every ranch hand carries a machete oftentimes tucked under his belt. Ranches go through machetes like corporate types run through office paper.    


Because ranches use up machetes there are often shelves or barrels in the barn or storage room filled with ancient and worn out machetes. Periodically they’ll be hauled off to the recycling plant and sold as scrap. Or someone like me will come along and take the lot and bring them back to life. Remember a worn down machete is usually not much wider than an inch or so. But I like to anneal them, reshape them, heat treat and temper the blades then wrap the handles with parachute cord. I usually temper the blade higher than it was in its youth but that gives me an option to use the new “machete” for other tasks like gentle woodcarving. I’ve refurnished dozens of old machetes and given them to friends or family. One of my boys must have at least half a dozen at his place. The one pictured above doesn’t weigh much more than a feather and is kept tucked between the seats in my pickup. Yes, machetes make fierce fighting tools if need be and when I was a newspaper man in a former life I witnessed the outcomes of several machete fights. In a word, nasty. The small machete above measures 12 3/8 inches long and the blade measures 7 7/8 overall. The parachute cord can be unwrapped and used for other purposes if need be.


I bought this Condor golok machete about a year ago. It came sharp and is well made. Sorry folks, I just can’t bring myself to use it—at least not yet. She’s such a pretty thing.


Here’s a sneak preview of a project I hope to have completed by late summer or sooner if the Great Spirit allows. A leaf spring destined to become a parang machete. I for one can hardly wait!


Monday, May 2, 2011

Nopalitos ala Lita

When the subject of saints comes up I always say I knew a saint, or at least in my life I knew someone who was as close to what I believe a saint should be. That person was my grandmother, Rafaela Guerra de Valverde. My grandfather called her Rafaelita but the grandkids couldn't navigate around that name so she became Lita for all of us. She’s been gone many years now but I think about her often. She was an artist specializing in crocheting and needle point, and she was a master cook. But perhaps her greatest accomplishment was her willingness to devout herself to family, and somehow she managed to make each grandchild feel as if he or she was the most special. I suspect a lot of you have known someone like my grandmother. Or at least that would be my hope.

Walking into Lita’s kitchen was like entering the realm of a master chef. She cooked and baked a gamut of foods with the classical touch of old school methods and ingredients. Admittedly, the grandkids were spoiled by her cooking and so was one of the governor’s of Texas who having tasted her flour tortillas asked a friend of his to bring a batch to the governor’s mansion on his next trip to Austin. Undoubtedly a bit partial but I’ve never tasted tortillas de harina as good as the ones my grandma made.

My grandfather, Trinidad Valverde Sr., was a dedicated woodsman and when the prickly pear cactus began offering their first springtime shoots he’d always collect a bunch and bring them home for Lita to prepare. First, here’s how to gather nopalitos. 


It’s important to harvest only the tender young pads as pictured above. Larger pads have a lot of spines and do not have the taste of the young pads. Also, pick your nopalitos in the early morning before the sun has dried the pads and thus reduced their water content.


Sometimes you’ll have to reach into a clump of prickly pear to get the nopalitos you’re after. Notice how some nice nopalitos are hidden within the clump. This can be tricky so bring along a pair of tongs and it’s best to wear gloves.


Traditional pocket knives are named for their blade designs. My favorite nopalito harvesting knife has long, thin blades and is known as a “muskrat pocket knife.” Any kind of knife can be used and some folks prefer large kitchen knives.


Always be careful when stepping into a clump of prickly pear like the one pictured above. Notice the tuft of grass. A couple of species of large rats build nests under prickly pear clumps. Rattlesnakes love rats. So step in carefully if you know what I mean…

When you collect nopalitos you’ll want to bring along an old magazine or some newspapers in order to keep the young pads well separated. This makes the cleaning process easier since you don’t have to spend time (or take the risk) of impregnating one pad with the spines from another. In case you forget to bring an old magazine or newspaper you can use clumps of grass to separate one layer of nopalitos from the other. Don’t forget the warning about rattlesnakes.

Using either your tongs, a clothes pin, or a makeshift tong made from a stick about eight inches long and sliced down the middle to about halfway, take each nopalito and carefully remove the spines and pudgy ephemeral leaflets. Once you’ve removed the spines you should thoroughly wash each pad to make sure you removed any spine remnants.

Now cut the cleaned pads into small squares about half an inch or less in size. With that completed you’ve finished all the preliminary work and are ready to either cook the nopalitos or simply use them as part of a salad. Note: Different species of nopalitos have varying tastes. South Texas nopalitos are particularly scrumptious but I’ve tasted nopalitos from other areas that were a bit tart even somewhat bitter. It behooves you to do a taste test before collecting a mound of young pads only to find out their taste is too strong for your liking. Some suggest that the fewer spines a prickly pear species has the tastier the nopalitos will be. That’s true to an extent but should not be held as absolute.

My Grandmother’s Recipe: “Nopalitos ala Lita”
1.     Wash the pads to make sure there are no spines.
2.     Cut pads lengthwise around ¼ to ½ inches wide and then cut crosswise about the same width.
3.     Fill a pot with water and add 2 slices of onions then bring the water to boil.
4.     Add about 3 cups of sectioned nopalitos to the pot and boil until the nopalitos change color from green to grayish-green.
5.     Drain the nopalitos and then rinse them in cold water until the slimy juice residue runs out.
6.     Heat 1-2 tablespoons of oil (olive oil, canola oil or vegetable oil) in a skillet.
7.     Add the nopalitos and stir fry for a couple of minutes.
8.     Add 1 teaspoon (or more or less depending on your taste) of Gebhardt chili powder,  ¼ teaspoon ground cumin, ¼ teaspoon black pepper, a clove of chopped garlic, and salt to taste.
9.     Beat 4-5 egg whites in a bowl until stiff peaks are formed. Fold in the yolks.
10.  Pour egg mixture over nopalitos and fold in the nopalitos until the egg mixture is cooked. Note: Don’t stir but instead just keep folding in the nopalitos.

Nopalitos are traditionally eaten with corn or flour tortillas but enjoy them however you prefer. You’ll also find dozens of nopalito recipes on the Internet so give it a try if you live where prickly pear grows. Oftentimes you can simply go to the grocery store and buy nopalitos already cleaned and sliced. It’s so much more fun however to harvest your own prickly pear pads and make them on your own. Bon appétit.     

Sunday, May 1, 2011

Anacua Berry Feast

Despite an exceedingly dry season and a somewhat disappointing harvest we’ve still managed to forage from a number of native plants. This week I picked anacua (ah-nah-kwah) (Ehretia anacua) berries from a couple of trees heavily laden with the fruit. When I was a kid my grandparents had a large anacua tree on the corner of their lot next to the sidewalk. In the midst of berry production the sidewalk became a slippery mess of squashed berries and, in fact, the cement turned yellow-red until the rains came to wash the residue away in late May or early June.  My cousins and I would gather under that anacua tree picking and eating the fresh berries and all of us became connoisseurs of sorts in differentiating taste variances as the berries ripened from deep yellow to dark red. Yellow berries have a slight tartness while red berries are the sweetest. Depending on palate particularities one of us might concentrate on yellow while another might dally more in the reds.


Anacua berries are about the size of a pea. They contain a small seed that aficionados separate from the pulp using the tried and true tongue-and-tooth manipulation method. Skilled anacua berry eaters can handle several berries at once maintaining a constant seed from pulp severance with near simultaneous mouth to ground jettison all the while plucking new berries from the tree. When kids congregate to pick anacua berries the immediate area becomes reminiscent of a group of cedar waxwings or maybe even parakeets clustered for a feast. Yakking, eating, spitting out seeds; afterwards, a ground littered with seeds, footprints, and a cleanup crew of hordes of sugar ants.

DISTRIBUTION MAP OF THE ANACUA TREE