Tuesday, February 22, 2011

Tree Species Range Maps


Woodcraft encompasses much more than knowing how to use a knife, learning how to make fire with sticks, chopping wood with an axe, or acquiring the skills to make a wickiup. Of course, most woodcrafters extend their knowledge far beyond those areas. One topic, however, that invariably gets left out is the knowledge of native plants. The flora that lives around us varies according to our part of the world. Canadians, for example, have different native plants from those living in Australia. Each geographical region has its own unique ecological makeup as species over time (both flora and fauna) filled niches that ultimately captured free or unutilized energy that flowed through the system. Remember that nature always attempts to transfer energy successfully from one point to another and in order to accomplish this many species occur that, in their own way, take advantage of available free energy. When energy is lost (oftentimes because humans have manipulated the system) the overall ecology degrades because the loss of biological diversity causes the waste of useable energy. Physicists call this form of lost energy entropy.

Some of us spend our lives studying the ways energy flows through biological systems and you may not be so inclined. But if you want to master the field of woodcraft you must learn the plants that grow around you. I’m not speaking of simply the edible or medicinal plants but all the plants. Train yourself to recognize different plant species and learn the group or family names that harbor each species. From there learn the genera and ultimately the exact species names. On forum sites we often see people speak of “elm” or “oak” or “ironwood” or any number of other common plant names. But it’s much better if you learn the scientific names because even within genera the individual species can vary greatly and common or folk names usually refer to many different types of plants: What one person calls “ironwood” in one area might be a completely different plant with the same common name in another area.


An old sendero trail in deep South Texas during winter. I identified 64 different plant species as I walked this trail on February 21, 2011.

Most people would hike the above trail and not see more than five or six plant species. They would not notice the differences between things like Ziziphus obtusifolia , Condalia spathulata and Koeberlinia spinosa. Nor would they see any differences between Prosopis glandulosa, Acacia rigidula, Pithecellobium ebano or Leucaena pulverulenta.


Near sunset: The knoll beyond the fence contains 48 different shrub species. Many of them by-the-way were used by pre and post-Columbian Indians for both food and medicinal sources. The Native Americans living in the area still employ those plants for various home remedies.


Sunset in the South Texas Brushlands. The large trees are mesquite, Prosopis glandulosa.

I’ve posted a link to a website that contains distribution maps of most US, Mexican and Canadian trees. Go to “Tree Species Range Maps.” Notice the number of species per genera. It’s a good place to start your native plant identification learning. Besides, it’s a lot of fun spending an afternoon identifying the plants growing naturally around you. After you’ve learned the woody species you can study shrubs then, if they’re available, you can concentrate on cacti (or succulents) and from there go to ferns and fungi. And don’t forget reptiles and amphibians…and mammals…and birds too. Then it’s on to rocks and soil types and….
   

Sunday, February 20, 2011

My Woods Roaming Gear


I find toting a backpack cumbersome and uncomfortable. Besides, in a region where people speak of “melting summers” and “warm winters” and a “cold spell” is as transient as a teenage heartthrob, the idea of restricting air-flow to your back becomes imprudent. Within minutes your shirt, from neck bone to coccyx, deteriorates into a drenched sponge and not long afterward a serious heat rash sprouts wherever the backpack pressed against your skin. Imagine putting a heavy wool coat on in 110 degree heat and going for a five mile hike. In the semi-desert Brushlands a backpack—nylon or canvas—amounts to too many inches of hardcore insulation.  So experienced walkers and hikers learn to make adjustments or suffer the consequences. Most Old Timers carry canteens instead of hydro-packs and just about everything else gets slung over the shoulders too in order to allow breezes to bathe the body. Perhaps old habits are hard to break but when I look at century old photos of those who roamed the thorn forests and gravely ridges they were doing pretty much the same thing.

My basic woods roaming gear is contained in two sections carried either loosely or cross-wise over my shoulders. Hanging from one shoulder I carry my cutting tools and a canteen and hanging from the other shoulder a small musket bag. Without question the most important item a Brushlands woods roamer can pack is water. You carry water and then you carry more water. Trek a few miles west and you hit desert and you’ll trade every extra ounce of unnecessary gear for a few mouthfuls of water. Next comes a hat; a wide brimmed hat. From that point on it’s all luxury. You can survive without a knife by chipping rocks into blades, scrapers and hand axes but you’ll not last long without water. And without something to shade your head you’ll burn and blister and die of heat stroke. I’m always amazed at the number of people who ask to go hiking with me and yet never seem to carry water. Most of them consider themselves experienced woods people—biologists, naturalist, hunters—but they seldom bring water. And guess what: I never offer them any of mine. But I’m always watching them and if I see they’re in trouble I’ll give them a drink and pray they’ve learned a lesson.


Here’s a picture taken this past weekend. I’m carrying my musket bag. It’s light and doesn’t burden my shoulder. You can’t see the cutting tools I’m carrying over the other shoulder but those pictures are provided below. I’m not carrying my main canteen in this photo but it was nearby.


This is what I carry in my musket bag: Water bottle; flashlight with extra batteries and bulb; 20 feet of parachute cord; two five-foot rolls of braided nylon rope; butane lighter; alcohol disinfectant and bandana. Below are two plastic bags. One carries toilet paper and the other a micro-fiber rag to clean my glasses and binocular lenses. On top from left to right is a Marttiini 571 carbon steel knife with a rawhide sheath I made from a dog chew; ferrocerium fire-starting rod set in a small deer antler tine and a small leather sheath connected to the rod; an old Schrade carbon blade mini-pocket knife with sheath. I use it to shave nopal (prickly pear) spines off young pads (called: nopalitos) to cook on a spit or with eggs, tomatoes and chile petin back at camp.


Most of the time I carry this set of cutting tools wrapped together with duct tape and a couple of rubber bands. The two middle sheaths are made of canvas and the two outer sheaths were made from a discarded nylon strap.


I carry the two folding knives in my pocket; the trapper in my right pocket and the SAK in my left pocket where I also carry a spare bandana. The cutting tools consist of two hybrid style crooked knives I made. Refer to my YouTube video on crooked and hook knives at http://www.youtube.com/watch?v=-0qpVW5r15M. The small saw was part of a larger pruning saw blade I purchased and cut into two parts thus making two smaller pruning saws. I hafted both saws to a couple of pieces of chaparro prieto wood and now have two convenient saws for the price of one blade. Of course, my saws are not the “In Thing” amongst Bushcrafters who relish purchasing all the mainstream gadgets (you know what I’m talking about) but I’m frugal (cheap?) and I’ve only got about five dollars in each of my little homemade saws which makes sense to me. The machete is a Tramontina made in Brazil. As machetes go the Tramontina is okay. It’s not the end-all or the ultimate but it serves the purpose. I’ve used machetes for over 50 years and was given my first machete at the age of eight…and then put to work clearing brush around a cabin on a ranch in southern Tamaulipas, Mexico where my dad ranched. Machetes tend to be cheaply made and are more-or-less disposable. They are the quintessential all-around cutting tool from just north of the Rio Grande to southern Argentina and every country from Mexico on south has at least one factory that make machetes. I use mine (I own quite a few) to strip thorns off branches and clear prickly pear out of my way if I can’t go around a clump. The idea is to circumvent obstacles and not spend all your time whacking away and wearing yourself out.


My two-quart canteen and my 8x30 Zeiss binoculars that are marked made in West Germany. That gives you an idea how old they are. I bought three pairs of Zeiss binoculars back in 1980. Two were 8x30 models and one was an 8x56GB model. They were considerably less expensive then than they are now. I gave one pair of 8x30 binoculars to my oldest son and have kept the other two which are as bright and clear as they were when I bought them. Maybe I’m not so cheap after all. But once you start using top of the line binoculars you can never go back to anything but the best!

The above items are strictly for day hikes where I’m in easy reach of food and a vehicle. On extended forays I bring a few additional items. The above gear doesn’t weigh much with the exception of the water which decreases in weight as consumed. I’ll post what I take on longer forays in the days to come.                            

Tuesday, February 15, 2011

A Man and His Dog


Oy was the first born of a litter of four. He got his name from a story my youngest son, Ethan, read and whatever that name means it more-or-less fits his personality. Blue Heelers aren’t supposed to be loving dogs and according to the “experts” they aren’t fond of being cuddled. They’re also supposed to have ears that stand straight up as if on constant alert and their eyes aren’t supposed to be blue. The “blue” in their name comes from the bluish cast their coats produce in sunlight and the “heeler” name is derived from their predilection to nip at the heels of cows in order to make them obey. They’ll heel people too, especially children, and when my youngest sons were little our Blue Heelers herded them and kept them in the yard and never took their eyes off the boys.

Blue Heelers also come in a red phase and those are called Red Heelers. Technically, however, this breed is known as the Australian Cattle Dog. Either way, Oy, doesn’t quite fit the mold although his three sisters are classic examples of the breed and his mother would probably make a show dog if she were a city girl instead of a ranch hand. Oy’s daddy, Dingo, is getting on in years and has taken his retirement with pension. He’s mellowed too in his old age. But in his prime he was a fierce protector of the homestead and family. A relative who raises horses once thought she could just walk into the yard and pet Dingo even though I warned her that probably wasn’t a good idea. She ignored me and opened the back door and immediately shut it then looked at me having turned from pink to bed sheet white. She owns a few Heelers too but admits Dingo will always be King of the Heel….excuse the pun.

Like I said, Oy doesn’t exactly fit the mold. Don’t get me wrong: He’s a ferocious protector and won’t tolerate anything, man or beast, coming close to me when we’re out woods roaming. He always sits looking away scanning the surroundings, sniffing the wind and listening for any aberrant sounds. If a wild hog happens to venture within view when we’re out hiking Oy will let the beast know on no uncertain terms that regardless of size disparities he will fight to the death to protect his master.

At night when we’re sitting by the campfire Oy will press against me as if yearning for the closeness and if I extend a hand to pet him he relishes the moment. He loves to be cuddled.

I never go anywhere without Oy. When my boys were little they were my constant companions. Esteban, Jason, Matthew and Ethan all spent countless hours with me hunting and roaming. Every plant we came across was examined and studied and recalled with both common and scientific names. The same went for birds, mammals and reptiles. When my son, Jason, was five years old he already knew the scientific names of more than two hundred birds common to the area.  Ethan is in college now and is studying plants. Esteban is a committed environmentalist (as are all my boys) and Matthew is a serious woodcrafter.

I’ll always cherish those years with my children and there’s not a single hour of any day that I don’t think about my sons. If it weren’t for Oy I guess the Old Man would walk alone and though I live to roam the woods I still enjoy a little company now and then. In the late autumn and early winter of my life I think Oy will have to do. He’s a friend. He sits next to me as I write these words.


Mega Chisels


I’ve mentioned that many of the woods found in the Southwestern parts of The United States are nearly as hard as rock. The woods seem forged and compressed in much the same ways that various loose molecules were gathered then rammed into monoliths of granite, basalt and quartz. The woods are hard to work and unforgiving to those who insist on using brute strength to reshape them. Axing Southwestern woods, for example, oftentimes turns a young man’s elbows and shoulders into scraps of arthritic bone. And carrying the wood to build an Indian jacal (ha-kal) or using it to make yokes or horse corrals will dislodge lower vertebrae and make young vaqueros into old men by the age of forty-five. Ranch hands and woods roamers either learn to work smart or they grow old and tired quickly. Over the years I’ve seen just about every sort of contraption used to trick the wood into relinquishing its pieces. In some of the ejidos (eh-hee-dos) or agrarian villages of Mexico and on ranches in the Brushlands and on into the desert regions I’ve seen workers chip away at hardwoods using everything from sharpened screwdrivers to burning coals.

Below are photos of a couple of mega-chisels I recently made to coax shavings out of mesquite bowls and other woodcraft projects. The chisels were made from an old file. The file was 16-inches long and a quarter inch thick. When new it had a fine cross-grid diamond pattern that was probably used as a blacksmith’s finishing tool. The larger chisel measures slightly over 1½ inches across the blade and is 16 ½ inches in overall length.  The smaller mega-chisel measures 11/8 inches across the blade and is 15 inches overall.


The large mega-chisel’s blade juts out 4 ¼ inches from the handle and the smaller mega-chisel’s blade extends 3 ¼ inches. I used metal washers on both chisels as stops to keep the steel from drilling into the handle. Both chisels were reinforced with an amalgam of 30-minute epoxy glue and ultra-fine wood dust I keep handy for gluing.


Another angle showing how I curved the handles in order to accommodate the shaving action I intended to utilize when carving bowls. The upswept handles enable me to contour the bowl simply by manipulating the handle upwards or downwards.


This provides some perspective of the size of the two mega-chisels when compared to a Swiss Army Knife and two Flexcut™ chisels that I also hafted for making spoons from dry wood.

The mega-chisels allow me to use a rubber mallet to tap out wood creating either deep cuts or paper thin shavings. Because I’m using the inertia generated through the mallet into the chisel I can regulate the force used in my woodworking and I can work for hours without experiencing any sort of fatigue. It’s quiet work without the manic sounds of electric power tools or the incessant and obnoxious clouds of wood dust. As long as I’ve got something to immobilize the wood like a strap or vise then I can work sitting in the shade of a tree—a cup of coffee brewing on the campfire and my dog Oy glancing at me now and then to keep track of my progress.

Wednesday, February 9, 2011

The Pocket Adze


Bushcrafters know that cutting tools are some of the most important pieces of equipment needed in the woods. The quintessential bushcraft knife is touted as the most indispensable blade and a hierarchy of supportive blades follows.  Depending on personal preference, the axe, machete, adze, hook knife, crooked knife, saw and pocket knife enter as second, third, fourth and on down the line. All the while, the merits of each cutting tool is discussed and debated seemingly ad infinitum. But let’s face it: With the exception of a pocket knife you can’t carry a four-inch blade bushcraft knife or an axe or crooked knife or any of those other tools in your daily lives. Besides, how many of us actually strap on a US Marine combat knife or a belt axe or even a little Mora knife when we’re on vacation and decide to take a short hike away from the tour bus or at the roadside park or even when sauntering out to sit by a stream behind the cabin? 

I recall however seeing a TV show where a young couple nearly died when their planned five minute hike turned into a week’s ordeal after they got lost in the woods.  Aside from the fact that neither one possessed even minuscule woodcraft skills I wonder if their nightmare might have been less traumatic had they had a folding knife and a pocket adze. In a pinch the pair can save your life assuming you’ve taken the time to acquire some know-how and are prepared to tough it out.

 The pocket adze measures 5” x ¼” x 1” and can be carried, as the name implies, in your pocket. Or it can be carried in a small leather pouch or even in a compartment sewn under your belt.

 I usually carry it with a simple blade guard and a thick leather pad secured with a rubber band. I’ll show you below why the leather pad is important.

 Get in the habit of always carrying some sort of multi-tool. I prefer the Swiss Army Knife because it’s compact, lightweight and ergonomically superior (at least in my view) to other types of multi-tools. The main thing is that your multi-tool contains a good quality saw blade. Actually, I always carry two folding knives. The SAK and either a muskrat style, trapper style or canoe style folder.

If God forbid something happens—you get lost, for example—then with the pocket adze and your multi-tool you can survive indefinitely.  I’ve lived nicely for several days in secluded woods with nothing more than my pocket adze, SAK, some heavy nylon trot line and a tin cup. It’s not that hard to do assuming you don’t get snake bit or stung by a black widow spider or scorpion which are a few of the things we contend with in the Southwestern parts of The United States.

An adze needs a handle and it should look something like this. This is a piece of chaparro prieto (Acacia rigidula) that I’ve already sawed with my SAK. Remember to keep the angle of the blade between 45° and 50° in relation to the handle as an angle greater or smaller will make the tool difficult to use.

It’s important to note, however, that the pocket adze is much more than an adze. You can use it to baton firewood, as a scraper, and even as a mini-broad axe if you simply haft the blade at a right angle parallel to the handle instead of attaching it like an adze.


 Here I’m using the pocket adze to shave the bark off the handle. I keep the blade paper cutting sharp so removing the bark takes only a few minutes.

 Here’s the adze handle after I shaved off the bark.

 Let’s review the basic things you’ll need. First you need the pocket adze blade and a Swiss Army Knife. Remember as well that I carried a pad of leather attached to the blade via a rubber band. I also carry a roll of heavy nylon trot line but not as much as in the photograph. I simply included the large roll in the photo so you could see how it comes from the sporting goods store.

NOTE: I used the SAK knife blade to cut a shelf on the top section of wood that juts outward from the main handle. It’s important that you keep the shelf exactly perpendicular to the handle section otherwise the blade will cant either left or right. Work slowly as you cut out the shelf.

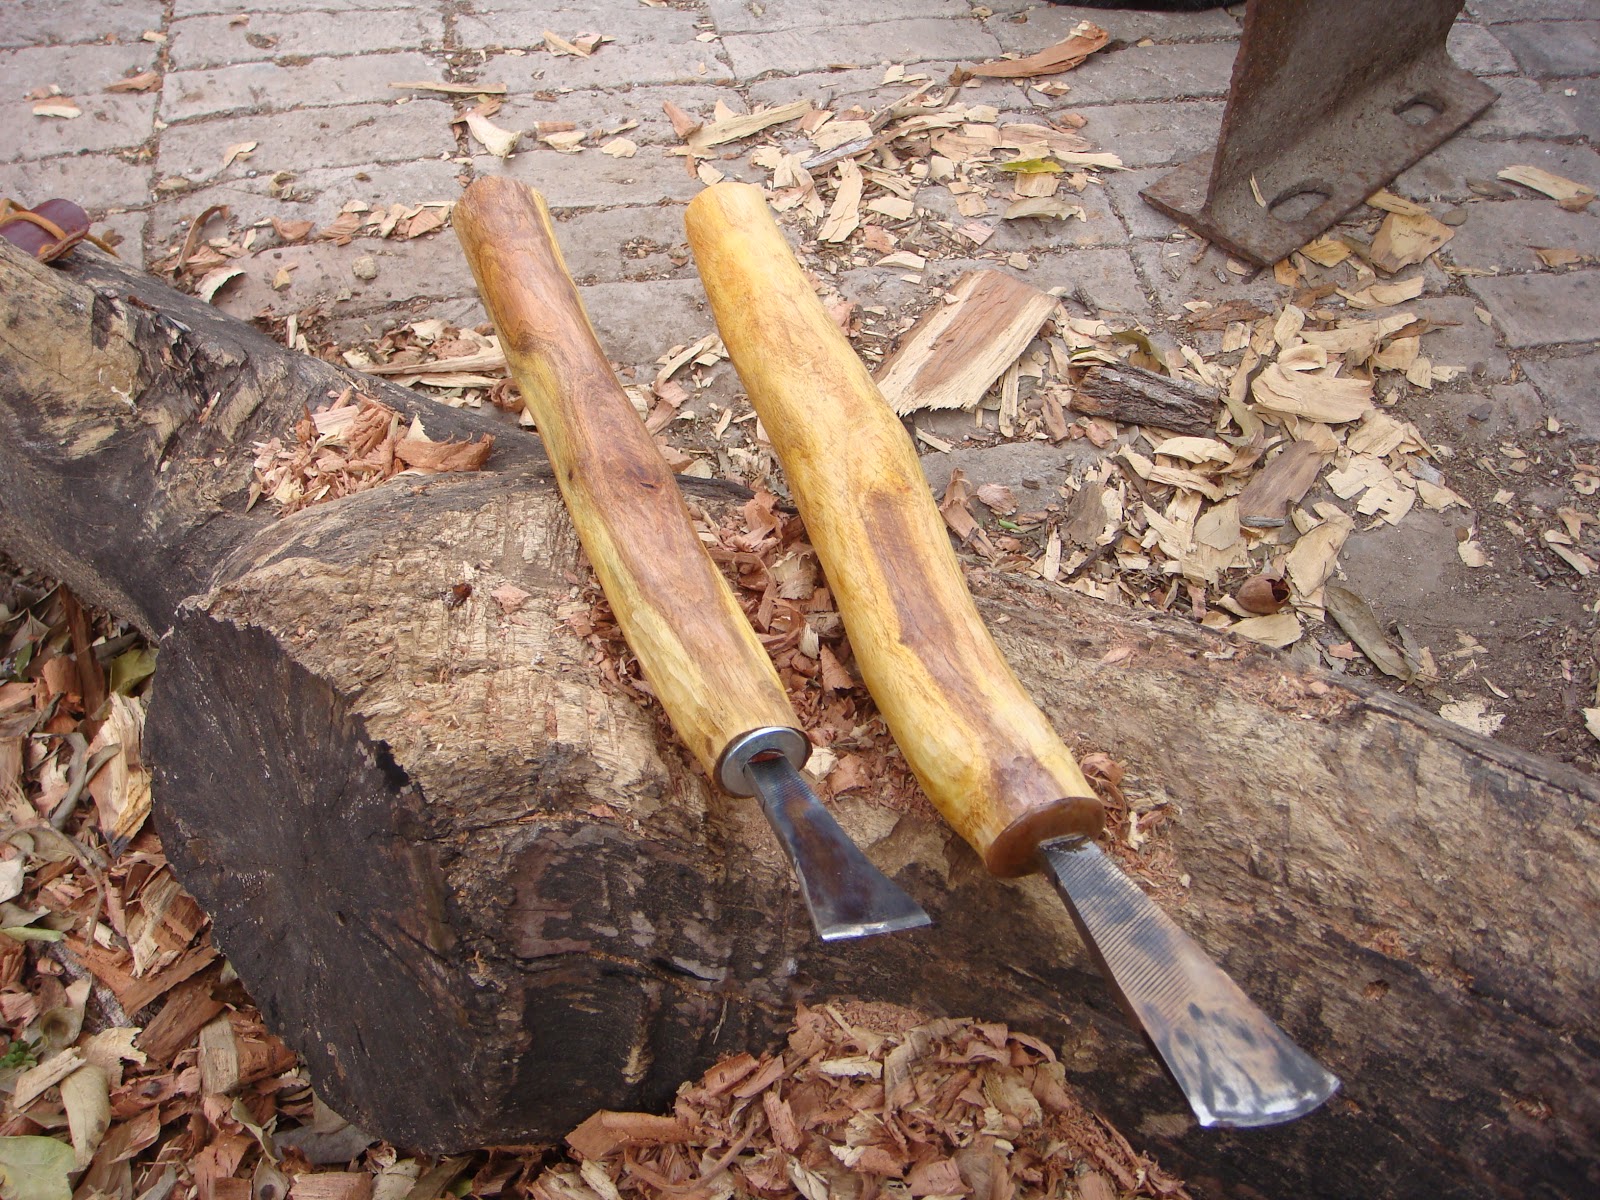
 Here’s the finished product. The little adze blade you carried in your pocket can now be used to build a camp, make traps and construct a bow. The leather pad rests securely underneath the blade and acts to both stabilize the blade and cushion the wood (particularly on the rear of the blade) when using the tool. It’s important to keep the handle and blade in proportion. This is a small adze and therefore does not require a huge handle. The handle pictured is 15 inches long from top to bottom. The handle is about 3 ½ inches in circumference making it a nifty, lightweight tool that’s extremely practical and fun to use.

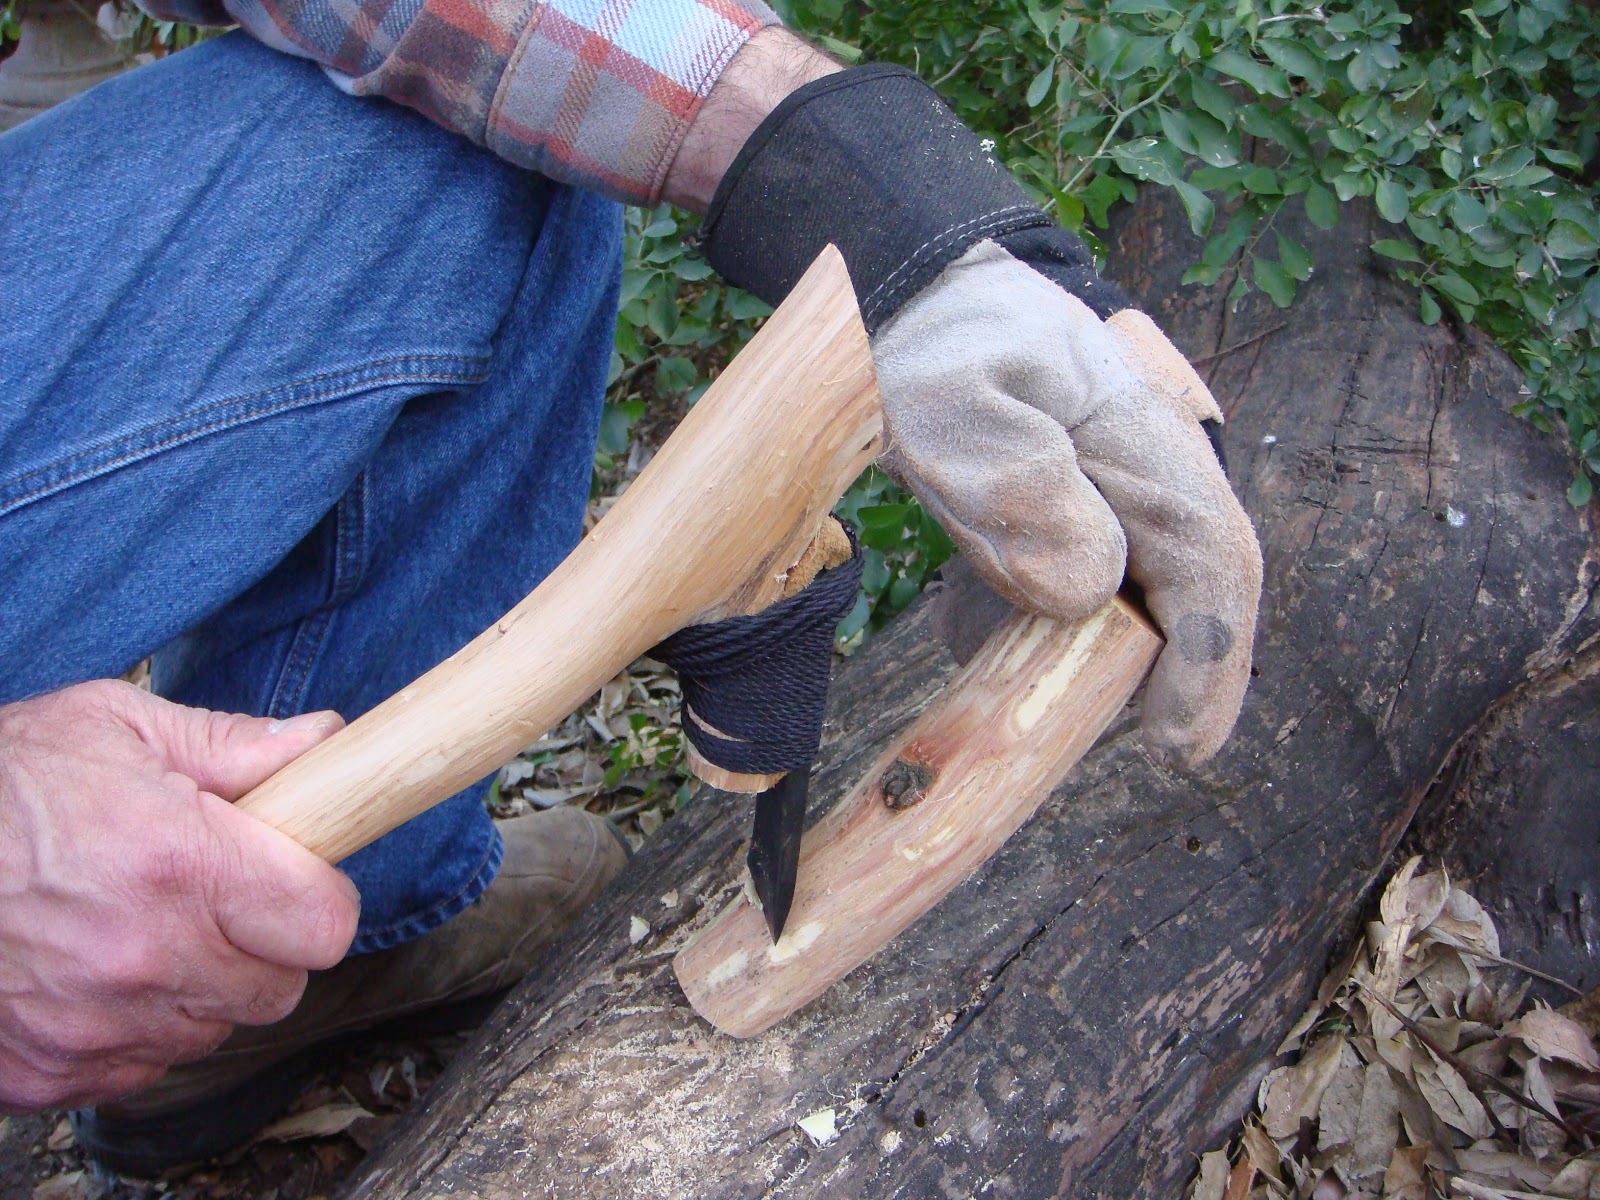
A view from the business end of the pocket adze. Wrapped tightly and secured over the leather pad keeps the blade from moving.

 Here’s another larger adze blade I make that’s carried in my pack. Of course, I call it the “pack adze blade.” A little bigger and heavier its only advantage is that it cuts faster and covers more area than the pocket adze.

So now it’s time to make something and in this case it was a spoon. Remember when using an adze always work the blade in a downward direction. That’s why the angle of the blade in relation to the handle is important. Every one has a slightly different swing thus the five-degree range (45° to 50°) that you will need to determine for yourself. You carve by moving the object you are carving and NOT by trying to adjust your swing. The swing always stays the same. You move the piece of wood forward or backward as you carve. That’s important to remember. Also remember that you’re looking directly at the things you are carving and though this is advantageous it requires caution. Because you are looking directly at the wood instead of from an angle—as you would do if using an axe—you are able to judge proportions and dimensions much easier. This comes in handy when making things like bows because you’re less likely to corkscrew around the stave, as neophytes often do, when attempting to “axe out” their bow. On the other hand, the fact that you’re looking directly at the piece of wood also means that the blade is coming down in front of you and if you’re not careful you might accidently hit your hand. (You’ll notice that in the picture above.) So you must be careful. I always wear gloves and suggest you do as well. Tucking a pair of leather gloves in your back pocket anytime you plan to go into the woods is a darn good idea.
  
Here’s another note: Some of you might be wondering how to judge the correct angle for the blade and handle attachment especially if you’re in the woods with no angle measuring tool handy. Just remember that a 45° angle is midway between a 90° angle and no angle at all. So anything on you that has a 90° angle can be used to get your 45° angle. For example, the cross on your SAK has four 90° angles. Your wallet has four 90° angles as do your credit cards or a dollar bill or you can simply open you knife to form a 90° angle or even use your hand and make a 90° angle with your thumb and pointing finger.
So there you have it. The little pocket adze is simple to use and easy to carry. No one will hassle you about having something so tiny and nonthreatening. The pocket adze is a multiple tool in itself and the more you use it the more things you’ll find it can do.