Friday, April 25, 2014

PART TWO: Replacing the Plastic Handle on a Malaysian Parang

The traditional Malaysian parang comes with a wooden handle.  The handle is sometimes sloped with a flare or bulbous end that helps maintain control of the tool when chopping.  Some handles are well made while others are crude and poorly conceived.  Plastic handles have replaced wooden handles in many models—particularly those found in hardware stores and other shops.


Bidor Parang with plastic handle

As detailed in the previous post the handhold section of the plastic handle is about 3 1/8 inches.  The overall handle length is 5 3/8 inches.  Using my Bidor parang for general brush cleaning and assorted bushcraft endeavors around the cabin proved uncomfortable as a result of the small handle and I soon relinquished the parang to storage.  After a while, however, I decided to replace the plastic handle with a wooden handle that mimics the handles I make for my Woods Roamer knives and larger choppers.


The new handle is made from mesquite.  It measures 6 5/8 inches long and incorporates a 3/8 inch long copper ferrule at the fore-section to support the parang’s stick tang at its widest part.  The handle’s circumference increases from fore to aft.  This allows the user to choke the handle nearest the blade when performing detailed woodcarving tasks.  The end-swell helps control the knife during light chopping.  I also rounded the steel nearest the handle to allow the user to grab that section more comfortably.  (Refer to photo)  Most of my Woods Roamer knife handles range about six-inches long but I decided to go a bit more on this knife  My biggest concern, as noted in the previous 
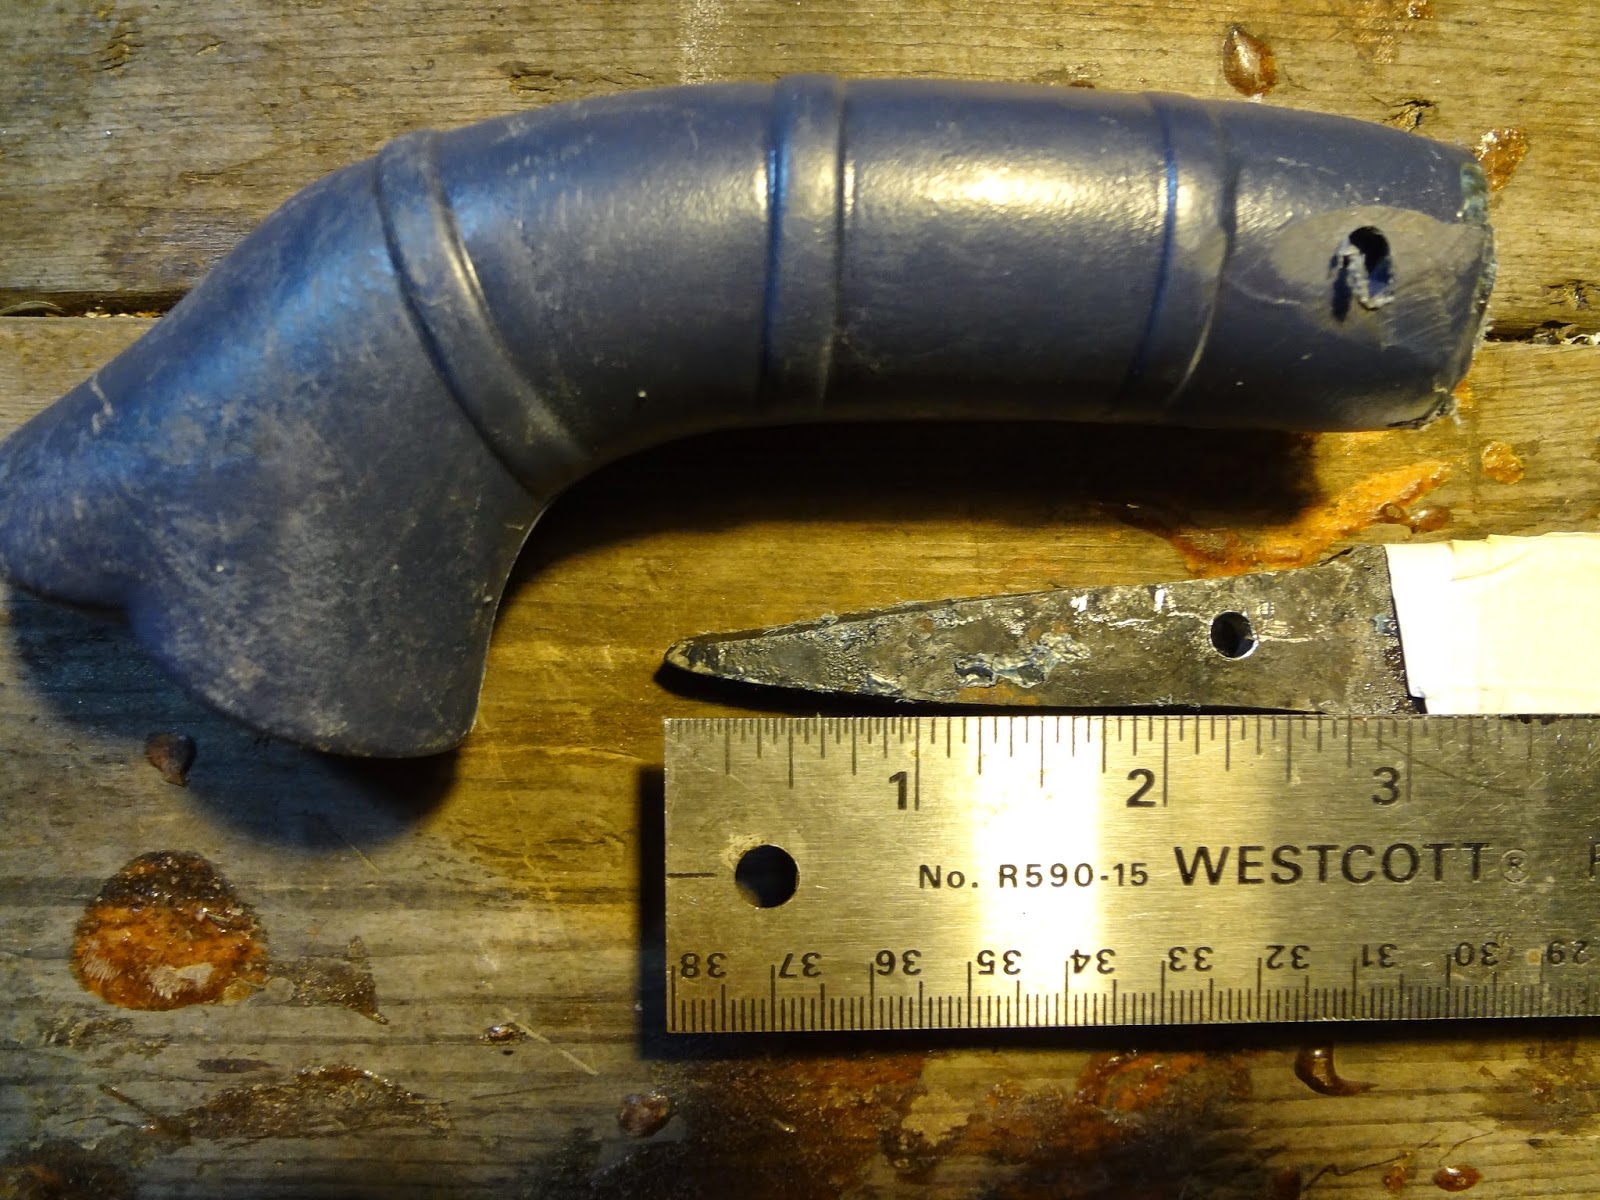
post, is the short and somewhat flimsy stick tang used on these parangs.  Honestly, I don’t believe I’d want to trust my life to this parang.  The tang, measuring only 2 7/8 inches long, is simply too insubstantial for any genuine survival use.  We should remember, however, that Malaysian parangs are made by villagers or in small shops and sell for a few dollars, a price well within the affordable range for rural customers.  Malaysian parangs were not designed for foreign markets nor were they intended to suit the needs of urban bushcrafters or survivalists.  They are inexpensive, quickly replaceable tools made from recycled steel and as such fit the needs of Malaysians—if not the needs of bushcrafters who end up paying from five to ten times (in the US or Europe) what the knife is actually worth.


Allow me to analyze the parang’s stick tang and its typical handle a bit more.  The stick tang is placed within the wooden handle via a hole drilled and filed directly into the wood.  As a sidebar let me add that on a YouTube video a Malaysian acquires a piece of green wood and then begins tapping a sharpened stick tang into the wood driving the sharp tang downward until it is fully inserted into the wood.  Apparently no cross-pin is used to help hold the tang in place.  The wooden handle (with the blade now attached) is then placed next to a fire to allow the wood to dry.  I think any knifemaker will look at that video and shake his head.  First, as the wood dries around the stick tang it will shrink in size and thus pull away from the tang.  This will loosen the tang within the handle.  Second, placing the blade so close to a fire creates the potential for destroying the steel’s temper particularly as heat travels up the blade towards the cutting edge.  In other words, this video serves as a good example of people doing things with little to no knowledge of either wood or steel dynamics.  Now let’s continue: If you drill a hole into a piece of wood you are weakening the wood’s strength around the hole.  The extent to which you weaken the wood depends on how deep the hole is drilled.  As an example, a short tang, as seen on Malaysian parangs, drilled under three inches does less damage than a five or six inch tang might create.  In that sense, the short stick tang, as seen on these parangs, works okay as long as we acknowledge that the concept is a compromise.  In other words, it works given the needs of those who use it.  If one intends to use a longer stick tang then I suggest instead of drilling a hole, one should cut the handle in two and then carefully inlet the tang into both sides (or scales) and then pin and epoxy the three parts (two scales and tang) back together.  This makes for a stronger handle since the tang is mated firmly (via inletting) into the wood with no void of any sort.  Note that the hole drilled into the wood to insert the stick tang in Malaysian parangs is often filled with epoxy.  This is good but not necessarily as strong as direct contact with wood as seen in proper inletting.  Let me add that one should avoid the urge to simply drill a large hole into a piece of wood in order to drop the stick tang into the hole and then fill the gap with epoxy.  That will not make for a strong core even when pinned.


I triple pinned this tang.  One pin is underneath the copper ferrule and two other pins are directly behind the ferrule as seen in the above photograph.

When I see pictures of Malaysian parangs I come to one of two conclusions.  Either I’ll think, “This fellow knows knife design,” or I’ll think, “This guy is a novice.”  I saw a post a few years back where a guy makes a handle for his parang.  I liked the way he carved the handle with his Mora knife but otherwise the finished product failed ergonomically.  I think the man even admitted that fact in a later post.  Good for him.  First of all, if you want to make a new handle for a parang you should find a branch with a natural curve and start your handle from there.  Don’t simply get a chunk of wood or a big, round branch and attempt to make your handle—unless the wood is big enough that you have enough to work with to form a sloping handle.  Also, some of these Malaysian parangs have a bulbous belly that despite its intentions crowds the hand, interferes with chopping and does little to keep the blade controlled.  If you want to see how a handle ought to be designed then please refer to the handle I made for this parang.  There is nothing original with this handle.  As mentioned in the previous Part One section of this post I am simply copying the handle of the great Colt Peacemaker that in my opinion is the most comfortable handle ever designed on any “working tool” bar none.  The Colt’s handle rolls with the recoil and thus does not bury the grip into the hand.  The handle on this re-worked parang does the same thing.


So there you have it, folks.  Will I use this parang now?  Of course, I will.  But I will use it knowing its limitations.  I am amazed at the videos I see where people take parangs even kukris and start chopping huge branches.  Hint: Use an axe!  The parang is designed for rainforest use especially in places with bamboo.  It works quite well in the desert Southwest and Brushlands as a bushcraft tool.  Machetes with longer 24-inch blades work as well if not better most of the time.  The parang’s short tang is decidedly disconcerting and every time I examine my Bidor parang I use my X-ray vision to see that tiny little bitty tang underneath and I think, “Hmmm, I wonder.”

Monday, April 21, 2014

PART ONE: Replacing the Plastic Handle on a Malaysian Parang

Most people think of the Malaysian parang as a short and somewhat portly machete.  But that description is misleading because parangs come in different styles with varying blade lengths, width variations and contours.  Depending on the locale a parang’s blade is either straight or curved upward or it might have a distinct angular cast near the handle that sweeps outward into the blade proper.  There is, therefore, no archetypal parang pattern with the exception of two design elements, one of which remains unseen and the other is a product of its manufacture.  Allow me to address the last element first.  Unlike machetes that are mass produced in large factories and buy steel from mills in significant quantities, the Malaysian parang is usually derived via a cottage industry.  In other words, villages may produce parangs for their own needs or in some instances a small shop might be set up with several bladesmiths to produce parangs for sale.  Regardless, the steel used for most parangs comes not from wholesalers but the junkyard.  That’s not to suggest that parangs are of a lesser quality than Latin American machetes but instead one might infer that the parang serves as an excellent example of metal recycling.  Typically, the parang maker seeks out leaf-springs made from 5160 steel and then forges them into shape.  This steel by-the-way produces a robust blade that, if heat treated and tempered properly, makes an excellent backwoods or jungle tool useful for everything from chopping small hardwoods to butchering game.  As such, the parang has become a sought after survival tool in regions where the blade design compliments the environment.


I purchased a 12-inch blade parang about a year ago because I wanted to examine the parangs manufactured at a shop in the town of Bidor, an industrial and farming community in the Batang Padang district of Perak, Malaysia.  I’m not sure what type of steel is used on the Bidor parang but I suspect these semi-mass produced parangs are not made from leaf-springs and may not be 5160 steel.  Perhaps someone will comment on this for us if they have further information.  The Bidor parang is not particularly heavy and on average the blade is about 4-5 millimeters thick at the rear tapering gracefully to about 2-3 millimeters at the blade tip with most of the blade in the 3-4 millimeter range.  The blade is of a type popularized by British survival expert Ray Mears who uses a parang in many of his BBC programs.  Mears parang looks to be handmade and is shaped slightly differently at the tip but that variation is of no consequence and is merely an aesthetic interpretation.

Here’s a quick note about this type of parang shape: When a piece of flat bar stock steel or a vehicle leaf spring is heated and then pounded on an anvil it begins taking a crude U-shape.  Therein lies the parang’s silhouette and the knife maker need only square off the tip or round it off and then either cut out a handle or, as in the case of the Malaysian parang, make what is called a stick tang.  Which brings me to the second design element—the one that remains unseen unless one removes the handle.


When my Bidor parang arrived I did what most knife aficionados do and that was to give the knife a thorough inspection.  I examined the blade noting the types of tools used in its making.  After having made quite a few knives I can look at a blade and tell you if an angle grinder, belt sander, hand file and even a Dremel tool was used in its manufacture.  Mind you the Bidor parang is a classic Malaysian working tool and as such not meant to be cute or fancy or as a fellow I know puts it, “Made for the mirror shiny bunch.”  The blade is painted black to protect it from rust, and tooling marks are left where they fell.  There is the “mirror shiny bunch” and then the parkerized, covert, stealth bunch.  You can include me in the latter group as I’ve never liked shiny knife blades.


When the stick tang was finally unearthed and measured I was surprised and a bit in disbelief.  The tang is 2 7/8 inches long and is only ¾ inch wide at the front or nearest the blade.  Now reason, logic and physics tells me that is way too flimsy.  But then who am I to argue with Malaysians who have employed this tang style for a very long time apparently with great success and few failures.  Even so, when I make a stick tang for my Woods Roamer knives and Brushland Choppers I have a tang that’s from 4 ½ to 5-inches long and does not taper as radically as the Malaysian parang.  It just gives me a bit more confidence when I use the knife but without disturbing the overall balance.


The actual hand-hold section on the plastic handle is a tad over three-inches before melding with the curved down swell.  That's far too short in my opinion.  Every time I used the parang I was frustrated and after a while I relegated the blade to what I call, “The Box.”  That’s where I keep a lot of blades.  But last night I was not in the mood to be inside nor was I very sleepy so I went out to the shed with camera in hand and the Bidor parang.  Within a few minutes the plastic handle was gone and I set out to make one with a more comfortable handle.  A few days ago a mean-spirited north wind blew a small mesquite tree down near the cabin and so with pruning saw in one hand, a flashlight in the other and a pistol in my back pocket I set out to cut a branch from yonder fallen tree for my new handle.  Now mind you that walking out in the dark searching for a suitable parang handle is crazy.  One must always be looking out for rattlesnakes and then when sawing off the branch it’s unwise to grab things without inspecting them for pamorana ants and scorpions.  Even in my little shed I’ve got to watch constantly for scorpions, centipedes, and the occasional rattler that will slither in looking for a meal.  Trick to it is sit on a high stool with feet off the ground and when a fat wind-scorpion, regular scorpion, giant centipede or ill-tempered rattlesnake comes to visit then watch and wait.  I usually kick the wind-scorpions out and step on the regular scorpions.  Best let the centipedes go their merry way because those things are nasty.  As for the rattlesnakes: Take a guess.


To make a new handle one needs a piece of wood, a ferrule (I’ll be using a ¾ inch copper tube that’s about ¾ inches long) and a couple of brass pins.  When I removed the plastic handle I drilled out the cheap nail that the manufacturer placed as a pin and opened up the hole a tad.


Regarding handle design: First of all, the best handle for any sort of chopping blade is one with a graceful curve that allows the hand to shift comfortably as the blade is used.  Think of this along the lines of the great Colt Peacemaker handle that rolls during recoil.  I examined several branches looking for just the right shape and at last found a section that I could use.  I took several measurements then using a hand drill made a hole about three inches into the wood.  I find that for me the ideal handle length is about 6-inches long.  The handle on the Bidor parang was only 5 3/8 inches long overall.  Using a series of round rasps and files I carefully opened the hole until the parang’s stick tang was set to the desired depth.  Now I’ll wait a few days allowing the wood to dry a bit before I continue.  Stay tuned, folks.  Part Two will arrive in less than a week.

Tuesday, April 15, 2014

HOW TO GROW YOUR OWN ARROWS....

For those of you who haven’t attempted making arrows using common reed or Phragmites australis may I suggest you give it a try.  A selfbow with a pull weight of between 35 and 50 pounds shoots phragmites arrows with amazing accuracy.  Interestingly, 90 percent of your phragmites arrows will not need to be sorted for flexibility or what archers call the arrow’s spine weight.  You can grow your own phragmites in your yard and thus have a ready access of arrow material when needed.  Phragmites arrows will take game up to the size of elk and they are also excellent for backyard practice.


Phragmites grows best in full sunlight and, in fact, the best reed arrows are harvested from exposed areas where the reed shaft can harden and thus develop a thick cuticle.  The reeds growing in the photo below are recent transplants to my gray water outlet pond behind the cabin.  Within a few days of being planted the rhizomes started to sprout.

Gray Water Pond


 Find a locale where phragmites is growing (look along drainage ditches, canals, ponds and other wetland areas) then dig around the base of an individual clump of reeds.  You’ll encounter the rhizomes or root complexes within an inch of digging.  Carefully cut around a section of rhizomes making sure to protect the smaller and more fragile feeder roots and then place the entire segment into a pot.  It’s preferable to collect from five to ten rhizome clumps (or more) in order to insure you’ll have a successful transplanting.  You need not include the reed shaft itself.  I usually collect rhizomes when I’m out gathering reeds to make into arrows.  I’ll slice off the reed with my machete and then collect the rhizome underneath.  That means when you plant the rhizome you’ll have a small part of the reeds projecting above the ground.  After you extract the rhizome from the ground you must quickly cover it with moist soil.  Rhizomes begin drying out almost immediately after being removed from the ground.  I cover each rhizome with moist dirt taken directly from the spot where the plant was growing.  I always soak the moist dirt with more water when I reach my truck but it doesn’t have to be immersed in water.  This insures that the rhizomes are saturated and helps them through the trauma of being taken from the ground.

Phragmites in gray water pond 

If you plant your rhizomes in a pot be sure the soil is well drained.  I place a layer of sand on the bottom leaving about one-third of the depth at the top with potting soil.  I plant the rhizome clump into the potting soil then cover the soil with a layer of mulch to keep the soil damp and protect it from other grasses or herbs that might take hold.

Phragmites growing around your gray water pond will help keep the pond free of herbaceous plants (weeds) and at the same time filter out any impurities in the water.  When the phragmites takes hold any odors associated with your gray water pond will all but disappear.  Be sure and plant several rhizome clumps around your pond so that the roots creeping underneath will spread evenly.  Within a year you will be able to start harvesting arrow shafts.

If you plant phragmites in pots then may I suggest you plant between five and ten 1-5 gallon pots.  In this way you can harvest the shafts in consecutive order.  In other words, you’ll begin at one end and as needed cut shafts from pot to pot.  By the time you finally get back to the first pot the reeds will have grown high enough to produce another round of suitable arrow shafts.

Phragmites stakes to start off grape vines

Phragmites also comes in handy for garden stakes.  The stakes above will support the grape vines until ready for transplantation.

I know people who make flutes with phragmites and of course it makes excellent thatch material.  When I was a boy I took part in thatching a number of jacales and even a large stone-walled cabin with phragmites.  Use your imagination.  Your phragmites plantings will serve for a number of projects from arrow shafts to bird houses to flutes to “tricklers.”  I’ll post an article on making bird houses with phragmites and some neat tricklers using both phragmites and Arundo donax.


Phragmites reeds drying